We came up with the initial design for the 10-acre Project Lombong after a couple months of deliberation. The first thing that we implemented was earth-shaping for water and access. The heavy machines would need to do their work before we start planting. After that it would be difficult for the machines to maneuver freely.
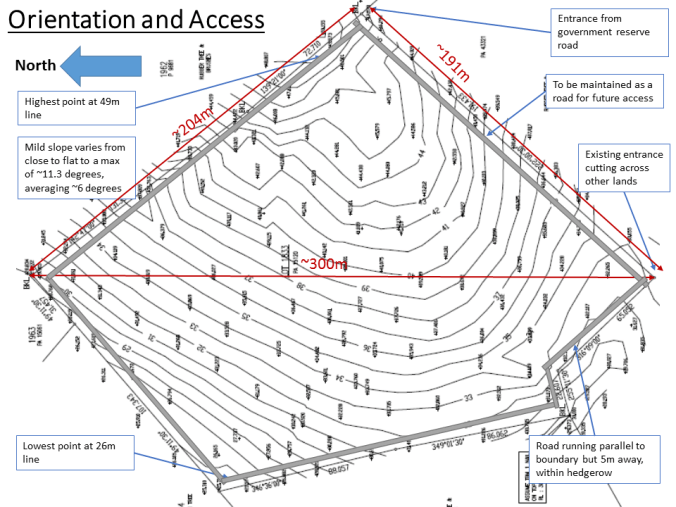
Lay of the Land
The highest point of the land is on the eastern corner at 49m elevation (top center on map below). From there, it slopes down to the west, ending at the western corner at 26m elevation (bottom left on map). The slope is mild: averaging about 6 degrees, with a maximum of 11.3 degrees. The shape of the slope is a ridge; there are no valleys.
We planned for roads to run along the boundary. They will be 5m from the edge to allow space for a hedgerow. Due to the heavy rains here, the earthworks contractor double-cambered the roads (highest point in the middle, sloping down to the sides) to help drainage. Some of the water will be diverted into swales to soak into the soil.

After digging the mudtrack, Kevin’s 4-wheel drive got stuck on the road once during a rain. He then decided to put gravel on the roads to help with traction. We were very lucky that the earthworks contractor found some spots on the land with red gravel. Those gravel will be excavated and spread on the sloping roads. These spots would then become ponds. That would save lots of money. Local experience is so important!

Road running on contour, integrated with swale
We also planned for two roads cutting across the land, running on contour and integrated with swales (red dotted lines on water map below). These contour roads will also be cambered, so that water flows back into the slope then passes through a culvert to go downhill. Again, we are trying to minimize water flowing across the roads to make them more durable. Because they are on contour, we would not be putting gravel because less traction is required.
Designing for Water
The region enjoys over 2 meters of rainfall annually. However, if not done properly this abundant resource can become destructive in the form of soil erosion, nutrient leaching, eutrophication of downstream water, and flooding. Funnily and cruelly, news of drought and water rationing has become increasingly common in recent years. A landscape in good health is able to retain and drain water well, thus moderating the peaks and troughs. That’s what we are aiming to achieve.
The site is slightly sloped and our objective is to pacify the torrential rains; let it meander slowly through the landscape instead of gushing straight down the steepest path. After the land was cleared to bare soil, we noticed gullies forming very soon at right angles to contour lines. During a rain storm, these gullies will bring top soil, organic matter, and lots of nutrients with them out of the site.


Looking at the water map below, the water system is connected by a series of swales, ponds, and overflows. From the top of the land, water runoff goes into a swale, when the swale is filled it overflows to the next lower pond. When this pond is filled, the water overflows to the next lower swale. And so it goes until the water exits the land at the lowest point. The water meanders and is pacified, allowing as much water to infiltrate the soil as possible.

Swales
While we specified for the swales to be dug wide and shallow with sloping sides, in the end we went with narrow and deep with vertical sides. The earthworks contractor told us that due to machinery restrictions, it would be faster and cheaper to go with the latter option. Even though a wide swale would fit gently into the landscape and be easier to walk across, however, in implementing our ideal design we still need to be adaptable to other considerations like the client’s budget, availability of a specific machine type, skill of machine operator, soil type, etc. In the end, we were pretty glad to heed the local earthworks contractor’s advice and the swales are working well. We just need a few bridges or strong jumping legs to get across! Unfortunately the brown color of the water indicates serious soil erosion, which isn’t a surprise given the lack of vegetation covering the soil…


Ponds
We designed for six ponds, scattered across the landscape at different elevations. The exact locations were chosen on the flatter parts. The ponds will be for water storage and aquaculture. We specified for the ponds to be 2-2.5m at its deepest with two steps of 0.5m down along the edge. The shallower depths will allow different aquatic plants, fishes, and wildlife to find their own niche. The maximum depth of 2-2.5m was chosen because “at this depth no unstable thermoclines develop to create sudden overturns of oxygen and temperatures; the ponds are easily wind-aerated and yet deep enough to buffer air temperature changes” (Permaculture Designers’ Manual, Bill Mollison).
Once again, our pond design had to be adapted for other considerations. The two-tier edge was quite difficult and expensive to construct, so we went with a simple slope. However, there was some miscommunication and the first pond that was dug had slopes that are too steep. Note to self: try to be on the site while earthworks are being done!
The soil had a high component of clay and we expected a good seal once the clay settles. It was only a matter of time before the ponds filled up. The pond at the top of the site is filling up more slowly because of a smaller catchment area while the bottom one is filling up much faster. For one of the ponds, we connected a swale to it to increase the effective catchment area.


Read more about how we design other elements of Project Lombong!
